Here I am again with another of my favourite recycle and repurposes. You know I hate waste and this post helps to deal with that. I know it's only in a small way, not on any grand scale whatsoever but I believe every little bit adds up to a big bit! So there's my philosophy for the day! Very indepth I know!
. Old cards
. Cardboard from grocery boxes
. Scraps of fabric and felt
. Old bits of jewellery
. Ribbon
. Twine
. Tin can and bottle lids
. Buttons
. Hole puncher
. Glue (I used cement glue) or a hot glue gun
They were so simple to make and you can have your kids or grandkids help. It makes a great crafting morning.

Firstly I cut out a card from the cardboard and used it as a basic template. I changed a few details, cutting the edges diagonally but that was it. After I'd cut out all of my gift tags it was time to start decorating. I used my hole puncher to cut out a circle for the ribbon to go through. Then I added the decorations, and that was fun! I could have made more, it was so addictive!
For the tree decorations I used a lid from a tin can and a lid from a glass jar. I covered these in felt by tracing around the lid onto the felt then covering it front and back with glue. I used an old earring on the red and white ornament because I always lose one of my earrings and end up with one, so that little red earring was perfect! I'm so glad I decided to keep the odd ones and not throw them out. I think it added a glamorous touch to it.

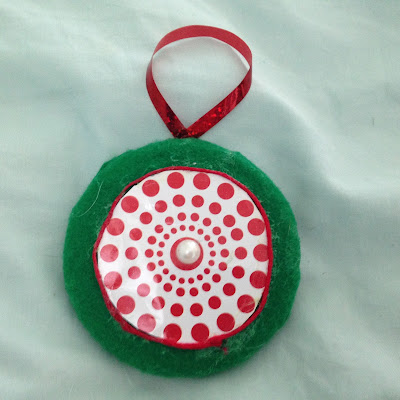
The green, red and white one above is covered in green felt and a piece cut from an old gift bag with a pearl sitting in the middle.
I thought these would be great for my granddaughter and grandson. I used buttons and scrap felt.

I had so much fun making these, my granddaughter wants to make them as well so we are setting up a date for school holidays next week. If you have cardboard boxes,which you can find in the pantry, tea, cereal etc, some bits of ribbon or twine, you can make them too. You can draw or paint designs, use stamps made from a cut potato or celery, old wrapping paper, old buttons, bits of broken jewellery, you're only limited by your imagination!
Have a great week everyone, I have some more ideas brewing for my next post so till then stay safe and happy
I've been doing some shopping looking at prices for Christmas cards decorations etc. and though it looks inexpensive I started adding up the prices of those little bits and pieces and it was more than I thought. My brain was on overdrive so I looked through my stash of recycled odds and ends and decided to start with Christmas gift tags and Christmas tree ornaments. Here is a list of what I used:
. Old cards
. Cardboard from grocery boxes
. Scraps of fabric and felt
. Old bits of jewellery
. Ribbon
. Twine
. Tin can and bottle lids
. Buttons
. Hole puncher
. Glue (I used cement glue) or a hot glue gun
They were so simple to make and you can have your kids or grandkids help. It makes a great crafting morning.

Firstly I cut out a card from the cardboard and used it as a basic template. I changed a few details, cutting the edges diagonally but that was it. After I'd cut out all of my gift tags it was time to start decorating. I used my hole puncher to cut out a circle for the ribbon to go through. Then I added the decorations, and that was fun! I could have made more, it was so addictive!
For the tree decorations I used a lid from a tin can and a lid from a glass jar. I covered these in felt by tracing around the lid onto the felt then covering it front and back with glue. I used an old earring on the red and white ornament because I always lose one of my earrings and end up with one, so that little red earring was perfect! I'm so glad I decided to keep the odd ones and not throw them out. I think it added a glamorous touch to it.


The green, red and white one above is covered in green felt and a piece cut from an old gift bag with a pearl sitting in the middle.
I thought these would be great for my granddaughter and grandson. I used buttons and scrap felt.

I had so much fun making these, my granddaughter wants to make them as well so we are setting up a date for school holidays next week. If you have cardboard boxes,which you can find in the pantry, tea, cereal etc, some bits of ribbon or twine, you can make them too. You can draw or paint designs, use stamps made from a cut potato or celery, old wrapping paper, old buttons, bits of broken jewellery, you're only limited by your imagination!
Have a great week everyone, I have some more ideas brewing for my next post so till then stay safe and happy


