Hi all, I didn't realise how long it's been since I posted! As you know I've recently moved to the beautiful Gold Coast. We are hosting the Commonwealth Games here next month, a huge event for the Gold Coast. Anyway as is often the case where there are crowds of people viruses tend to to spread. Unfortunately a severe outbreak of gastro has broken out here and I was one of the unlucky ones that caught it. A whole school was shut down because of the sheer numbers of students and teachers that caught it, so that gives you some idea of the severity of it. It's taken me awhile to get back on my feet but finally I'm ready to roll!
My unit has brick walls and I love them. I've seen so many beautiful decor pieces online but they weren't in my budget at this time so I decided to make my own farmhouse wall decor. I love the farmhouse style and I felt it would look great against the rustic brick walls. It's autumn here in Australia so I've been envisioning lovely old farmhouses with huge open fires, everyone snuggling around the fire drinking yummy hot chocolate and eating comfort food. I've stayed in a number of farmhouses over the years and some of my best memories are of my Aunt and Uncle's farm. It was a working farm with sheep and cattle and so many places to explore. Sliding down the timber ramps that the sheep went down after they were shorn was a favourite pastime until I slid down headfirst into sheep poop. I wasn't so keen after that episode! OK now back to the farmhouse decor. Here are the supplies that I used:
1. Timber board which I already had
2. Grey and white chalk paint and brush
3. Wire bin and wire cutters
4. Faux Flowers
5. Fabric with home printed on
6. Ribbon
7. Piece of burlap
8. Glue
9. 2 small nails


The first thing I did was use the wire cutters to cut the wire from the top and bottom of the basket. You need to be careful when you do this because the wire when cut is quite sharp. You may want to use gloves. I didn't because I find it hard to work with gloves but I managed not to hurt myself.
The timber board that I used needed to be painted so I did a dry brush using grey and white chalk paint to distress it. If you decide to do this you must make sure that only the tip of the brush has paint on it and don't use any water. That's why it's called dry brushing! If you have too much paint wipe the excess off using a paper towel. It's a good idea to practice on a scrap piece of timber first.
Once that was dry I cut my wire to the exact size that I wanted and used 2 small nails bent over to secure it to the timber. I also did a dry brushing of grey and white on the wire. As you see from the picture it was originally black.

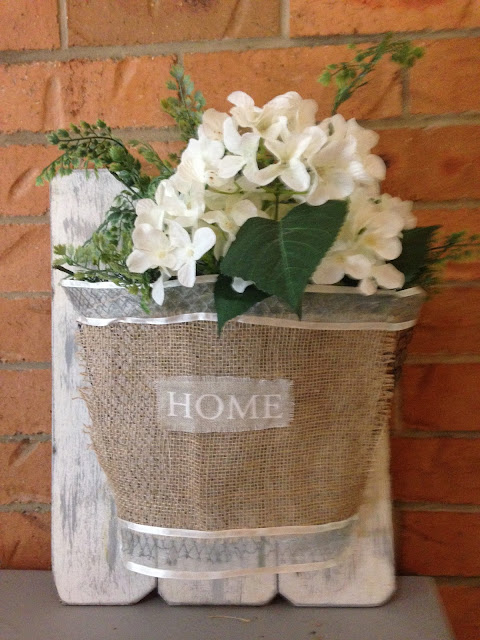
Once the wire was secured I added the burlap and ribbon with glue.
I felt as though it needed something else so I cut a piece of fabric that had the word home on it and glued that on.

I started filling the basket with the greenery first. Was that a mission! I fiddled and fiddled until I had it to my liking, which took forever. Finally I added the flowers in front. I haven't been able to put it on the wall as yet because I have to borrow a tool to drill holes in the brickwork. That's on my list of to do's.

That's it! It was actually quick and easy to make, if you don't fluff around with the flowers for too long like I did. A bit of OCD coming out.
I hope you like my rustic farmhouse decor, let me know in the comments below. Have a great week. Come and party with us at
Vintage Charm party, Before and after Wednesday
div style="width:100%;text-align:center;">

My unit has brick walls and I love them. I've seen so many beautiful decor pieces online but they weren't in my budget at this time so I decided to make my own farmhouse wall decor. I love the farmhouse style and I felt it would look great against the rustic brick walls. It's autumn here in Australia so I've been envisioning lovely old farmhouses with huge open fires, everyone snuggling around the fire drinking yummy hot chocolate and eating comfort food. I've stayed in a number of farmhouses over the years and some of my best memories are of my Aunt and Uncle's farm. It was a working farm with sheep and cattle and so many places to explore. Sliding down the timber ramps that the sheep went down after they were shorn was a favourite pastime until I slid down headfirst into sheep poop. I wasn't so keen after that episode! OK now back to the farmhouse decor. Here are the supplies that I used:
1. Timber board which I already had
2. Grey and white chalk paint and brush
3. Wire bin and wire cutters
4. Faux Flowers
5. Fabric with home printed on
6. Ribbon
7. Piece of burlap
8. Glue
9. 2 small nails


 |
The timber board that I used needed to be painted so I did a dry brush using grey and white chalk paint to distress it. If you decide to do this you must make sure that only the tip of the brush has paint on it and don't use any water. That's why it's called dry brushing! If you have too much paint wipe the excess off using a paper towel. It's a good idea to practice on a scrap piece of timber first.
Once that was dry I cut my wire to the exact size that I wanted and used 2 small nails bent over to secure it to the timber. I also did a dry brushing of grey and white on the wire. As you see from the picture it was originally black.

Once the wire was secured I added the burlap and ribbon with glue.
I felt as though it needed something else so I cut a piece of fabric that had the word home on it and glued that on.

I started filling the basket with the greenery first. Was that a mission! I fiddled and fiddled until I had it to my liking, which took forever. Finally I added the flowers in front. I haven't been able to put it on the wall as yet because I have to borrow a tool to drill holes in the brickwork. That's on my list of to do's.

That's it! It was actually quick and easy to make, if you don't fluff around with the flowers for too long like I did. A bit of OCD coming out.
I hope you like my rustic farmhouse decor, let me know in the comments below. Have a great week. Come and party with us at
Vintage Charm party, Before and after Wednesday
div style="width:100%;text-align:center;">